Injera is sometimes described as a pancake, sometimes as a flat bread, but whatever you call it, it is a quintessential element of Ethiopian cuisine, and I love it. As I have to regularly feed and eat my sourdough, I decided that an injera (of a sort) was an excellent project.
It took me a number of years to get a reliable rate of return on my experiments. This is not a perfect injera, as it is wheat based and does use a little more leavening than just the yeast in the sourdough, but the results of just sourdough, white flour, and water are too gummy to work well. This method will, however, produce a yummy injera that will work under any stew, or wat, or, really, whatever you might usually eat with bread to soak up sauces in any style of cuisine. Actual working time is not that long, but it is a process, so you'll have to plan for it.
Injera is a process, not a recipe!
1. Feed your sourdough starter the night before. I have a well established sourdough starter that I keep in the refrigerator. Take it out, pour off the liquid that has accumulated at the top (this is the alcohol that the fermenting sourdough has produced. You can stir it back in, but it will make a very sharp flavor that many people don't like. It will also make your starter more liquidy, and will require you to adjust the amount of liquid you add later), and scrape the rest into a plastic, ceramic, or glass bowl with plenty of room. Feed the starter one cup of flour and one cup of warm (but not too hot) water. Stir it up with a non-metal utensil*. Don't worry about lumps, just get it all moist. The bacteria and yeast in the sourdough starter will take care of the lumps. Cover the bowl, set it aside, and go to bed.
The amount of activity you get in your sourdough will relate to the temperature in your kitchen. Heat directly affects how fast the sourdough will rise and fall, with warmer kitchens producing faster rises, but 7-8 hours is usually enough in most North American kitchens to get it into the useful cycle without getting it past the useful stage (where you start producing significant amounts of alcohol).
In the morning, return 1 cup of the starter to a jar and place back into the fridge. The remainder in the bowl is what you have to work with for the injera.
If you don't have an established sourdough starter, you can get one either by following these classic instructions, or by purchasing one of the commercially available starters. Or you can get one from a friend. :-)
2. Measure out your remaining sourdough. I usually end up with between 1 to 1.5 cups. From this point, you must recognize that you are working with an ingredient that will never be as predictable as purchased yeast and be prepared for some flexibility.
3. Gather the things you need: a pan for baking, a liquid, and a baking mix. I have a dedicated, round, non-stick, flat griddle/pancake pan. A round frying pan of any sort will work, but this really works best with some kind of griddle pan, preferably something that won't require you to add a "lubricating" ingredient, like butter or oil.
As for liquid: I use almond milk, as this adds more flavor, more body, and more nutrition than water. Soy milk should work, but I haven't tried it. And for the baking mix: I use Bisquick's Heart Healthy mix, as it lacks milk and egg. There is some soy lecithin in it, but as of this time, it hasn't been a problem for me. If it ever gets to the point where it is, I'll just have to mix my own baking mix. There are plenty of instructions for a homemade baking mix online, so I won't go there now.
4. Add the milk and baking mix to the sourdough in the ratio 1 part sourdough to 1.5 parts milk, 1.5 parts baking mix. Let it rest for 15-30 minutes, to allow the sourdough to begin rising.
5. Heat your pan. Just like regular pancakes, test for heat by shaking a few drops of water on the griddle; they should roll about and jump and dance. Reduce heat slightly if needed--if you are the sort, like me, who heats on high, you'll need to cut that back when actually cooking the pancake. Medium to high-medium should do you for the baking of the injera. When the pan is heated, pour a small amount of the batter on to the hot pan and cook (as described below, beginning with #6).
This is where you must remind yourself that you are working with what is an ever-changing ingredient. What will work perfectly on day 1 will not work perfectly on day 2. The heat in your kitchen, the heat in your pan, the time you let the sourdough rise over night, the time you let the mix rise, et cetera, are a delicate balancing act.
When you finish cooking that test injera, eat it as soon as it is cool enough to eat. You are looking for it to be too thick or too gummy. "Gummy" can't really be described well, but if you ever ate a gumdrop, you know it. This method of making injera should produce, when right off the griddle, a very thin and flexible flat bread with a slightly gummy texture, but that texture should be something that you would eat even if a little gummy--you know, that "It's not perfect, but it's tasty and I can manage" sort of moment. If it's too thick--which is usually evident in the pour--add a little more liquid. If it's too gummy, add a little more baking mix and a little more liquid, and set aside another 10 minutes or so. Keep making little text injera until you are either at the point where you are satisfied with the texture, or you have invested as much of the ingredients as you are willing to invest and are accepting of the fact that this will not be a perfect batch (don't worry, though, you can still eat them, more on that later). Remember, though, the more baking mix and almond milk you add, the less intense the sourdough flavor will be.
6. Pour enough batter on the griddle to make a single, thin (about 1/8 inch) injera. Usually, your batter will land in the center and you will swirl it around to make a thin, even layer. Watch for the injera to start cooking and bubbling even as you swirl it around the pan; that's a good sign. Your pan is hot without being too hot and your batter is probably of a good consistency.

7. Let the miricle of heat, steam, and leavening do its magic. You will watch the injera carefully--small bubbles will appear and pop all over the surface. Let it all cook merrily until the top of the injera is dry. You'll recognize it. The above picture is of a dry injera. Spots that were still wet, still needing to cook, would appear brighter. It doesn't actually take very long to get to this stage.
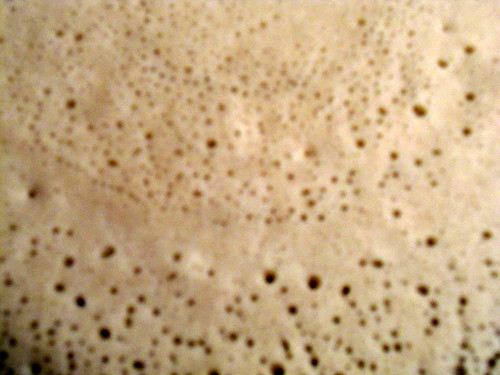
This is a closeup of the surface, with the contrast slightly enhanced, to show you what the surface will look like. The tiny bubbles, like this, are perfect. Larger bubbles are not a problem, but the more little bubbles you have the spongier the texture will be at the end. If you have larger bubbles, try stirring down the batter to reduce the amount of air in the mixture (remember, the yeast is not the only leavening agent at work here, so it's not a tragedy if you stir it down a little). If that doesn't work, make the batter a little thinner with a little more liquid.
8. Flip the injera. Traditional injera is finished at this point, but this recipe is better with a little heat applied to both sides.

You can see the path the batter took when I swirled it in the pan along the pattern in the injera. I usually leave it flipped just long enough to let steam start penetrating this side for 5-10 seconds. Not long, just long enough to let steam start working merrily. (Note that this is the point at which you eat your test injeras, otherwise, proceed)
9. Flip the injera again and move it to a covered dish. I usually place it on a ceramic plate, fold it in half (so that the brown side is out)and cover the plate with a glass frying pan lid. Why? Because you are going to let the residual heat and steam finish cooking the injera--that's what will move the texture from slightly gummy to spongy.
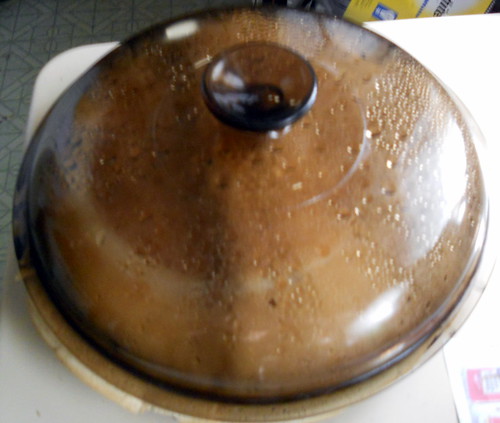
Stack the cooked injera into the covered dish as you cook them. When the last one is done, set them aside and let them completely cook to room temperature. You might want to remove the lid from the dish and shake off the condensation once while it's cooling, but if you forget, it's usually no big deal. Cook up a stew and have a delish dinner.
If your Injera isn't perfect
So you let steam get you to the end and you can't stop yourself from a nibble and decide that, well, this batch came out differently than you hoped. All is not lost, so don't put that stack of food that you spent money and time to make into the garbage yet.
First, cook up the stew you were going to make and try it anyway. Very often, what doesn't work plain will be just fine once it absorbs the sauces from the stew. You can also reheat this on the griddle, and that extra bit of heat will sometimes help.
If that doesn't fix it (and it's rare for me that thiese simple steps won't rescue an imperfect batch) then you can...
- toast them in the oven and eat with sugar, butter, jam, syrup, et cetera.
- Slice into strips and marinate with a sauce for a very soft noodle.
- cut up and fry with za'atar and olive oil, or some other favorite thing, like pesto or garlic or whatever.
Only my first batches, before I stopped stirring the two-week old hootch back into the sourdough or significantly under used baking mix, were ever so awful that I couldn't finish eating what I'd made. I find this to be usable all the time, these days.
Let me know how it goes!
Note:
Sourdough should not be mixed with or rested in metal utensils--the actions of the yeast and bacteria symbosis can pick up flavors from the metal.